Thursday, November 11, 2010

N900 Meego chroot part 3: polishing the process

In my first post in this series, I walked you through making a Meego chroot image from the raw images provided by Meego. In the second post, I gave you some rough scripts for starting the Meego UI in a Maemo chroot with the assistance of Easy Debian. In this post I'll present my new Meego image with the newest Meego UI and all the pieces installed to run without Easy Debian. I also present new scripts that streamline and improve the process.

The Image
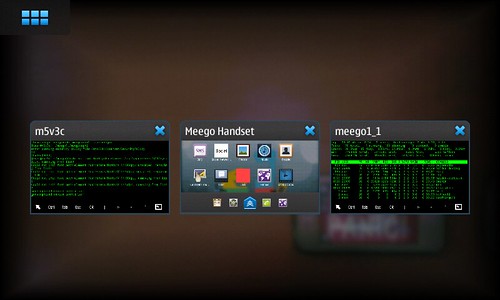
I have posted a new Meego image (lzma compressed) on qole.org for you, meego_1_1_b.img.ext3.lzma. This image has been updated with newer components, and so the UI looks a bit different, and I have installed Xephyr and xbindkeys. I have also copied over wmctrl and the keyboard focus binaries. These pieces now make it possible to just use the Meego image to do everything, without opening the Easy Debian image at all.

The Scripts
I have posted new scripts, meegoscripts2.tgz:
  • I have improved the chrootmeego script to use variables, so you can customize how you run Meego.
  • I have added a new syncmeego script that copies over the necessary files from Maemo to Meego. I got most of this script from this Meego wiki page, and I honestly don't know what effect the copied files actually have on the chroot (except the resolv.conf file, which we already knew about).
  • I have enhanced the startmeegoui script, now called startmeegoui3. This script now starts the Xephyr nested X-Server inside Meego, gives it keyboard focus, and then starts the Meego UI. 
  • I have added a new script, gomee (clever name, eh?), that opens the Meego chroot, syncs it, and then starts the Meego UI.

Some interesting bits in the startmeegoui3 script:
export M_USE_SOFTWARE_RENDERING=1
R. Burchell was kind enough to point out after my second post that this environment variable makes all Meego apps start with software rendering. Apparently, that was all that stood in the way of getting most of the Meego apps to run.

/usr/bin/mdecorator -software -remote-theme 2>/dev/null &
echo "sleeping..."
sleep 10
echo "...ok now"

/usr/bin/duihome --desktop -software -remote-theme 2>/dev/null &
The bold lines are new. Adding the sleep command seems to fix the strange white band that was appearing across the top of the Meego home screen. I'm not sure why, but it works, so... there you go.


Still To Do

The media apps (photos and videos) do not work yet. More precisely, they work, but they can't find any media. I suspect that someone needs to show us how to start the media indexer to get them working.
The phone app doesn't work. If you try to start it, it complains about ofonod not being started. If ofonod is started, then the phone app just never starts at all.

Labels: , , , , ,

Saturday, November 06, 2010

Running Meego Handset in an N900 chroot with Easy Debian: Part 2

In this post, I show you how to start the Meego Handset 1.1 "desktop" in a Maemo chroot, using Easy Debian and the image file you made using instructions in the last post.


DISCLAIMERS:

This is a very shaky process. It is in no way ready for use in any way other than "Oh that's cool!"

The animations on the desktop are very slow, and none of the applications seem to work except Fennec thanks to Robin Burchell, the applications all work now. Please update your scripts!

The Prerequisites:
  • You have a working install of Easy Debian on your N900, and you can start the LXDE desktop in a window.
  • You have made the image from the last post, and you have put it in your /home/user/MyDocs folder.

Quickstart:

I have written four little scripts that semi-automate the process of starting the Meego UI. You can download the zip file containing the four (updated!) scripts here at qole.org. You must put these scripts in the /home/user/meego directory, or edit the scripts to look in another directory.

Put the scripts in the MyDocs folder of your N900 (that's where they'll download if you just choose the root "N900" folder when downloading from the N900), and then, at the Maemo terminal prompt on your N900:

~ $ tar xzvf MyDocs/meegoscripts.tgz

Then:

~ $ cd meego
~/meego $ ./debmee

Hopefully, that's all you have to do to get the Meego 1.1 desktop to start up on your N900. Read on for more details of what's going on "under the hood."
Read more ยป

Labels: , , , , , , ,

Monday, November 01, 2010

Running Meego Handset in an N900 chroot with Easy Debian: Part 1

I would like to document my process for getting Meego Handset to run in a Maemo chroot on the N900 using Easy Debian, so you don't have to multi-boot your phone.

But I can't document everything in one post, and I'm documenting as I go, so this first post will be the just first steps: how to get an Easy Debian compatible image out of the raw Meego images that the Meego project is posting.

I do these first steps on an Ubuntu desktop machine.

1. Download the latest Meego Handset image. I got mine from the builds directory of the Meego repository, here:  http://repo.meego.com/MeeGo/builds/

The file you are looking for ends in .raw.bz2 and you can get to it by choosing the biggest numbered directory twice, then going into .../handset/images/meego-handset-armv7l-n900/  and downloading the .raw.bz2 file.

This is the one I'm using.

2. Unzip the file on your Linux machine.

I recommend becoming root for the entirety of this procedure. I suggest doing it before you even unzip the file. I had problems unzipping the file as a regular user, and this may have been my problem; I don't know, but what can it hurt to gain root right away?

sudo su -

Unzipping the file is pretty straightforward on a Linux command line:

bunzip2 meego-handset-armv7l-n900.raw.bz2


In these instructions, I'm going to call the meego file "meego-handset-armv71-n900"; substitute the longer version as necessary.

3. Mount the Meego rootfs partition on loop. This is tricky, because the raw image has multiple partitions and so you have to use a little trick I found on the 'Net, here.

a. You need to first create a directory to mount on. I created /media/meego:

mkdir /media/meego

b. Now mount the first partition. First check to see where the partition starts:

fdisk -lu meego-handset-armv7l-n900.raw

See where the first partition starts. Multiply that number by 512, and use it as the offset. In my case, it starts at 1 so the calculation is easy. It is just 512. This will probably stay the same for future releases, but it might change. Better to document this, just in case.

mount -o loop,offset=512 meego-handset-armv7l-n900.raw /media/meego

4. Now make a new image file that will just have the Meego rootfs in it, so it can be mounted properly by Easy Debian. I made my image 1GB, but you can make it bigger if you want.

dd if=/dev/zero of=meego_1_1.img.ext3 bs=1024 count=0 seek=$[1024*1000]

You have to format the new image file! I used ext3.

mkfs.ext3 -m0 -L meego1_1 meego_1_1.img.ext3

5. Mount the new empty image file. I made a mount point, /media/meego2, but you can use whatever name you want.

mkdir /media/meego2
mount -o loop meego_1_1.img.ext3 /media/meego2

6. Copy the Meego rootfs to the new image file you created. Substitute the correct directories here.

cd /media/meego
tar -cf - . | ( cd /media/meego2 ; tar -xpvf - )

7. Unmount everything.

umount /media/meego
umount /media/meego2

8. Copy your new Easy Debian compatible image file to your N900. I would suggest using the USB cable, but there are lots of ways to do this. You can also zip up your file to keep a safe backup.

Next post:

I'll try to post again soon with directions for getting the Meego Handset UI started under Easy Debian's Xephyr nested X server.

Labels: , , , ,